
"An ounce of prevention is worth a pound of cure."
It's an old saw that never gets outdated--and it's true: sometimes you have to spend a bit now in order to save later. Look no further than Virginia earlier today to see that there is no instance in which this is more true than preparing for an emergency. Spending now could save you money later on--and more importantly, maybe even save your life or that of a loved one.
Before Jimmy was born, I worked for the City of Bellevue. All City employees were expected to be available to help assess damage to local infrastructure in the event of an emergency or natural disaster, and because I lived within 2 miles of city hall, I was in the first tier expected to report. The big risks in that area were earthquake, volcanic eruption and terrorist attacks. That's when I got in the habit of having a portable 72-hour kit stashed under my desk at work that included a change of clothes, food, water and first aid, as well as one at home and a smaller kit in my car.
Now we live in a more rural area, but we're still at risk for earthquakes and volcanic eruption, and flooding is a problem in our county every year, although this past winter is the first time we ever found any water leaking into our basement.
Currently, I keep a kit in my home near the front door, as well as the mini-kit in my trunk. The big one's in a large wheeled plastic storage chest that includes a backpack for each person with clothes and food, along with first aid and sanitary supplies for the whole family. It's true, I go through various stages of vigilance in rotating and updating the contents of my kit, but my recent bout of nesting got me thinking I needed to check it.
Last week I gutted and reorganized Jimmy's and Audrey's closets, and it seemed like the perfect time to swap out the change of clothes in their kit backpacks with the sizes they're currently wearing. I also went through and replaced all the food that was outdated, and added a new feature to my kit: a "refresh list". I got the idea from a recent issue of Parents magazine, which suggested keeping a card with a list of the expiration dates of all perishables in your kit, so you could see at a glance what needed to be updated.
If you want to put together a 72-hour kit on your own (since pre-assembled kits tend to be pricey) and are looking for a good place to start, try 72hours.org. I also like this checklist put together by the Washington State Emergency Management division.
Just remember: you don't have to put it all together at once. Start with a container large enough to hold all the supplies for however many people are in your household. If you don't already have something suitable on hand, try an inexpensive container such as a large food-grade bucket or a suitcase or backpack you pick up for a couple bucks at a thrift store.
Buy a few items for your kit each week when you purchase your regular groceries, or go in with someone else if there are items you need to purchase in bulk. By working at it gradually, you can assemble your emergency kit without breaking the bank.
Showing posts with label emergency preparedness. Show all posts
Showing posts with label emergency preparedness. Show all posts
Tuesday, August 23, 2011

Wednesday, September 08, 2010
Yum

Go ahead and laugh; I would. Oatmeal is not one of those things you'd expect to inspire rave reviews, much less instant oatmeal. A couple weeks ago I bought a box of Oat Fit to put in my 72-hour kit. I had a few packets left over, so they've been sitting in my pantry.
Usually my standard breakfast is a slice of my homemade bread with some organic peanut butter and a glass of low-fat milk. Quick, but plenty of energy. I've been too busy to bake lately so I've been eating cereal for breakfast for a while. Yesterday morning I finished off the last of my only box of Grape Nuts. So when I got home from a walk in the rain this morning, and glanced around for something to warm me up, the oatmeal caught my eye.
While it was still cooking in the microwave, my mouth started to water because it smelled so good. What's truly amazing, is it tastes even better than it smells.
Did I mention it's sugar free? And no, I'm not getting paid for this post. It really tastes that good.
Sunday, September 14, 2008
Summer in a jar
 Every year at the beginning of September, my mother-in-law heads to her favorite orchard in Wenatchee to buy peaches. She grew up there and has known the owner for decades. His peaches are always lovely: firm but tender, unblemished, and the flavor is... well, amazing.
Usually Jim and I have her pick up a 30-pound box for us, which will yield about 18 quarts of canned peaches. Last year I was still recouping from Audrey's birth so I didn't can any peaches, but this year we ordered two boxes.
I used to borrowed my mom's kettle whenever I was canning, but about five years ago I invested in a nice big one of my own that can process nine quarts at a time. Jim and I spent the last two evenings in the kitchen with our oscillating fan cranked up to high and the back door open to let out some of the steam emitted from the kettle.
For me canning is always about bonding with family and sharing skills. I learned how to can from my mom, who put away fruit and vegetables every year when I was little. My dad taught me the nifty trick of using a table knife to slide the fruit halves through the neck of each jar so that they stay round side up and form orderly nested stacks. Jim learned about canning from his mom, and always pitches in. This year Jimmy was old enough to start helping, and was very proud about learning how to cut the peaches in half and then peel off the skin. The fruit will be that much sweeter when we eat it because we worked together.
I woke up sore and stiff this morning, and it was only with much creaking that I managed to extract myself from bed. But how wonderful to come down into the kitchen for breakfast and see the neat rows gleaming in the early morning light, like so many jars of bottled sunshine.
Tuesday, May 20, 2008
Tightwad tuesday: best bargains

While it doesn't fall strictly under my purview of emergency preparedness, I've wound up as a sort of de facto member of our ward Relief Society's enrichment committee. On Thursday night we've got an enrichment meeting that will be focusing, appropriately for this time of year, on gardening. My contribution is to prepare a little booklet of "tightwad tips" for the ladies to take home with them. This is right up my alley; I'm a long-time penny-pincher.
It was a fun assignment for me because I love the chance to do creative layout and design on my computer, as well as the chance to share the many money-saving tips I've amassed over the years. Some of the tips in the booklet are ones I collected as a teen and have been using as long as I can remember, others I've picked over the years, and a few I found just recently.
Not long ago Motherhood for Dummies visited my blog, and when I checked out hers, she had some great tips for saving money, which I included in the booklet along with the others. All this focus on frugality got me thinking: maybe some of my on-line friends and family might enjoy these tips, too. So I proudly present a new feature at chicklegirl: Tightwad Tuesday. For my first official tightwad post, here's a list of eight of the best bargains around (because by now you should know how I feel about bargains... and the number eight). Please feel free to leave your tips for great bargains, too.
Best Bargains. Ever.
It was a fun assignment for me because I love the chance to do creative layout and design on my computer, as well as the chance to share the many money-saving tips I've amassed over the years. Some of the tips in the booklet are ones I collected as a teen and have been using as long as I can remember, others I've picked over the years, and a few I found just recently.
Not long ago Motherhood for Dummies visited my blog, and when I checked out hers, she had some great tips for saving money, which I included in the booklet along with the others. All this focus on frugality got me thinking: maybe some of my on-line friends and family might enjoy these tips, too. So I proudly present a new feature at chicklegirl: Tightwad Tuesday. For my first official tightwad post, here's a list of eight of the best bargains around (because by now you should know how I feel about bargains... and the number eight). Please feel free to leave your tips for great bargains, too.
Best Bargains. Ever.
- The public library. Where information, knowledge, and self-education—and even time on a computer using the internet—are available at no cost.
- Toothpaste and dental floss. A lot of toothpaste and dental floss can be purchased for the price of a filling.
- Thinness. Because one simply eats less.
- A 42 cent postage stamp. The US Postal Service will carry any volume of information under one ounce thousands of miles for the same price.
- Paper. The best present for a child is a pencil and a piece of paper.
- Walking. It burns calories, gets you where you want to go, and no special equipment or costly memberships are required.
- Public places. Places of interest that are free and open to all.
- A single zucchini seed. Gardening saves on your grocery bill. Especially if you like zucchini.
Wednesday, March 05, 2008
Guilt-free less brownies
 For the past few weeks I've been fixated on brownies.
It all started because of my church assignment to teach food preservation and emergency preparedness classes. A couple months ago my mother-in-law and I taught an evening cooking seminar called "Wheat 101" about the nutritional value of whole wheat, how to grind flour at home, baking bread, and a few other cooking-with-wheat tips and tricks. It was so popular, I decided to do a "Wheat 102", which I taught two weeks ago. The whole idea was to present fun ways to use wheat in every-day cooking, so as to keep food storage rotating regularly. We had one presenter who did a wheatgrass display, one who showed how to steam wheat and use cracked or puffed wheat, and I demonstrated making whole wheat brownies and pizza crust.
I do homemade wheat pizza crust all the time, but I had never baked whole wheat brownies. I figured it couldn't be too difficult, so I found a couple of recipes online to try and... whoah! Maybe the rest of the whole wheat-eating world just has apallingly low standards, because the first two recipes I tried were nasty: dry, crumbly, flavorless, and completely lacking the fudgy goodness so essential to an acceptable brownie. With only a couple days to go before my class, I started panicking. I needed a really tasty recipe, or I would have a hard time selling people on the concept of making every-day recipes with food storage items.
Thank goodness for Google; I found some great suggestions for changing the consistency of the brownies which helped me to understand the chemistry behind the undesirable results I had produced so far. With a bit more tweaking, I finally arrived at the recipe below on my third try. In all humility, I think it's actually better than brownies from a box, even the Hershey's Triple Chocolate Chunk mix you can buy in bulk at Costco. These whole wheat brownies have passed both the picky husband and picky teenager tests. You'll never notice the extra fiber hiding inside all that moist, rich fudginess! Oh, and if you want a non-stop one-way ticket to a diabetic coma, you can also frost them.
Fudgy Whole Wheat Brownies
1 cup vegetable oil
2¼ cups sugar
1 tablespoon vanilla extract
4 large eggs, plus two egg yolks
2/3 cup unsweetened dutch process cocoa
1 teaspoon salt
1 teaspoon baking powder
1 cup whole wheat flour
1 cup chopped walnuts or pecans (optional)
1 cup chocolate chips (optional)
1. Preheat the oven to 350° F. Lightly grease a 9" x 13" pan.
2. In a medium-sized mixing bowl add the sugar to the oil and stir to combine. Stir in the vanilla and eggs until mixed thoroughly.
3. In another mixing bowl, sift together the cocoa, salt, baking powder, and flour. Stir into the bowl with the wet ingredients until smooth, then add the nuts and chips, again stirring until smooth. Spoon the batter into the prepared pan.
4. Bake the brownies for 25 to 30 minutes, until a toothpick inserted into the center comes out clean. The brownies should feel set on the edges and in the center. Remove them from the oven and cool on a rack before cutting and serving.
5. Frost if desired (see recipe below). Makes two dozen 2-inch brownies.
1 cup vegetable oil
2¼ cups sugar
1 tablespoon vanilla extract
4 large eggs, plus two egg yolks
2/3 cup unsweetened dutch process cocoa
1 teaspoon salt
1 teaspoon baking powder
1 cup whole wheat flour
1 cup chopped walnuts or pecans (optional)
1 cup chocolate chips (optional)
1. Preheat the oven to 350° F. Lightly grease a 9" x 13" pan.
2. In a medium-sized mixing bowl add the sugar to the oil and stir to combine. Stir in the vanilla and eggs until mixed thoroughly.
3. In another mixing bowl, sift together the cocoa, salt, baking powder, and flour. Stir into the bowl with the wet ingredients until smooth, then add the nuts and chips, again stirring until smooth. Spoon the batter into the prepared pan.
4. Bake the brownies for 25 to 30 minutes, until a toothpick inserted into the center comes out clean. The brownies should feel set on the edges and in the center. Remove them from the oven and cool on a rack before cutting and serving.
5. Frost if desired (see recipe below). Makes two dozen 2-inch brownies.
Chocolate Frosting
1 stick (½ cup) butter
2/3 cup unsweetened dutch process cocoa
3 cups powdered sugar
1/3 cup milk
1 teaspoon vanilla extract
1. Melt butter in a small sauce pan (or in a glass mixing bowl in the microwave—on high for 30 seconds).
2. Stir in cocoa.
3. Alternately add powdered sugar and milk, beating on medium speed to spreading consistency.
4. Add more milk, if needed.
5. Stir in vanilla. Makes about 2 cups of frosting.
1 stick (½ cup) butter
2/3 cup unsweetened dutch process cocoa
3 cups powdered sugar
1/3 cup milk
1 teaspoon vanilla extract
1. Melt butter in a small sauce pan (or in a glass mixing bowl in the microwave—on high for 30 seconds).
2. Stir in cocoa.
3. Alternately add powdered sugar and milk, beating on medium speed to spreading consistency.
4. Add more milk, if needed.
5. Stir in vanilla. Makes about 2 cups of frosting.
So... it was all well and good until my friend Debbie, who was attending the seminar, and who also happens to be diabetic, piped up and asked, "Do you have a recipe for sugar-free brownies?"
In the two weeks since, I've attempted four different batches of sugar-free brownies, which gradually evolved from a recipe I found on Splenda's website. The trickiest thing about cooking with Splenda is it has completely different chemical properties than sugar, and in baked goods especially, it tends to dry things out. The original recipe was for Butterscotch Brownies, but with my first batch I tweaked it by omitting the butterscotch chips and pecans, substituting whole wheat flour, and adding unsweetened cocoa. Success? Nope: dry, grainy and crumbly.
For the next incarnation, I added extra egg yolks (the secret ingredient which helped my whole wheat brownies to be so fudgy), as well as some sugar-free chocolate pudding, to try and combat the crumbly, dry texture. Unfortunately, between the pudding and extra yolks, I wound up with something similar to chocolate soufflé. On my third attempt, I omitted the eggs altogether. Better, but still too oily and gooey (without being fudgy).
Today I finally got it right. I cut back the pudding and the oil by half, and the result was a moist brownie with a rich chocolate flavor. Not as fudgy as I tend to like them but still pretty darn good for sugar-free.
Sugar-free Brownies
1 cup cold milk
half of a 1.4-oz package of sugar-free instant chocolate pudding mix (about 1/6 cup)
1/2 cup vegetable oil
1 tablespoon vanilla extract
1 cup whole wheat flour
2/3 cup Splenda
¼ cup dutch process baking cocoa
1 teaspoon baking powder
1/2 teaspoon salt
1. Preheat oven to 350 degrees F.
2. Combine flour, Splenda, cocoa, baking powder and salt in medium bowl; set aside.
3. Combine pudding mix, milk, oil and vanilla in a large mixing bowl with a wire whisk. Gradually beat in flour mixture.
half of a 1.4-oz package of sugar-free instant chocolate pudding mix (about 1/6 cup)
1/2 cup vegetable oil
1 tablespoon vanilla extract
1 cup whole wheat flour
2/3 cup Splenda
¼ cup dutch process baking cocoa
1 teaspoon baking powder
1/2 teaspoon salt
1. Preheat oven to 350 degrees F.
2. Combine flour, Splenda, cocoa, baking powder and salt in medium bowl; set aside.
3. Combine pudding mix, milk, oil and vanilla in a large mixing bowl with a wire whisk. Gradually beat in flour mixture.
4. Bake in greased 9" x 9”pan for 25 to 30 minutes or until wooden pick inserted in center comes out clean. Cool in pan on wire rack. Cut into bars.
Now I have the brownie bug out of my system, I'm free to move on and obsess about something really important—like whether I should color my hair for my 20-year class reunion this summer...
Tuesday, October 16, 2007
Juicy like lucy
 On Sunday at church Jim and I were called to be the emergency preparedness specialists for our ward. It's interesting timing because Jim's parents, who live in the ward right next to ours, are the emergency preparedness specialists for their ward. So when Jim and Gail told us about an opportunity to make and preserve grape juice from some Concord grapes they had gleaned down in Clearview, I decided I couldn't pass it up: if I was supposed to be leading my ward's effort, I had to walk the talk.
Gail, who has been preserving grape juice for years, was gracious enough to show me the ropes yesterday and let me use her kitchen and canning equipment. I supplied my own jars, lids and rings. Contrary to what you might think, making grape juice doesn't take a lot of constant work (like, say, canning peaches) nor does it turn your feet purple. Your fingers yes, but not your feet. Rather than using the type of operation made famous by Lucille Ball, we used a steam juicer like this:
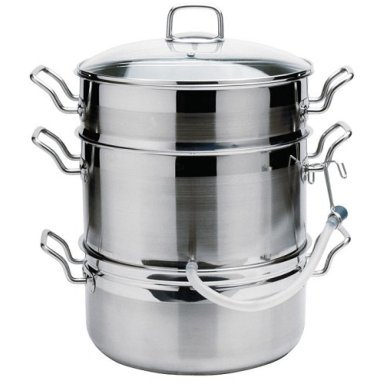 The process for making grape juice is simple. The juicer sits on a burner on the stovetop, and is kept on high heat. The bottom part of the juicer is filled with water (and a little bit of vinegar if you have hard water like we do), which has to be replenished every hour as it boils down. The next section collects the juice as it is steamed out of the grapes, and has a hose connected to it from which the juice flows out and can be collected in canning jars. The top section is similar to a large colander, and is filled with grapes (or other fruit or vegetables to be juiced).
Over a period of an hour and a half, about 36 cups of grapes will condense down to about four to six quarts of juice concentrate. (To make juice for drinking, mix roughly one part water, one part finished concentrate.) Because the juice comes out boiling hot, it doesn't have to go in a water bath for the jars to seal themselves; we just wiped the rim of the jar clean after filling it, put on a sterile jar lid (boiled in hot water), and screwed a ring on tightly. As the jars cooled, they self-sealed, and voilà!—canned grape juice concentrate, with a shelf-life of about five years. Not to mention much higher quality and much less expensive than store-bought juice.
Most of the time, it was a "hurry up and wait" kind of process. Once an hour I changed the water. The grapes had to be cycled through about every hour and a half. I spent a lot of time reading, chatting with Gail, and playing with the kids while I waited for the juice to process. As the juice collected, I would fill two or three jars at a time, and then go back to doing other things.
The most demanding aspect of the whole operation was the sheer amount of time it took. I started at about ten in the morning and it took me until almost 11:30 last night to finish four fruit boxes full of grapes, which yielded just over four dozen quarts of concentrate. By the time I was done, my feet and back were killing me—and my kids wanted to, as well! Actually, Jimmy and Audrey were surprisingly patient and cooperative with the project. Fortunately, we were at Grandma's house, and she had plenty of toys and books. So Jimmy exhausted the possibilities for building amazing contraptions with Tinkertoys, and Audrey napped most of the day. I was able to stop and nurse her when she got hungry.
All the hard work was worth it: as I labeled the jars and gently placed them back in their boxes, it was immensely satisfying to see them full, gleaming garnet like giant jewels. I know that this new calling will be a blessing for me and my family.
Subscribe to:
Posts (Atom)


